Pawfection User Guide
Welcome to Pawfection!
Streamline Your Shelter: Pawfection - Commanding Care with a Click!
Welcome to Pawfection, your desktop application for managing animals in a pet shelter, designed with you, the volunteer, in mind. Pawfection aims to provide a platform for volunteers to store and retrieve information about animals and tasks easily, ensuring seamless coordination within the shelter.
Why Choose Pawfection?
With Pawfection, experience a new level of convenience and control:
- User-Friendly - Experience the best of both worlds with Pawfection's seamless Command Line Interface (CLI) and Graphical User Interface (GUI) integration, tailored for effortless navigation.
- Unified Animal Dashboard - Access all your shelter's animal data at a glance with our centralized information system.
- Effortless Animal Management - Streamlined with user-friendly tools, effortlessly add, edit, remove, and save animal details in a matter of seconds.
- Streamlined Task Tracking - Manage your shelter's daily duties with ease using Pawfection's straightforward task management features.
Revolutionise Your Shelter Today!
Begin your Pawfection Journey - New to Pawfection? Get started with our Quick Start Guide!
Table of Contents
- Quick start
- Navigating the GUI
- Pawfection Tutorial
- Features
- Command Format
- Attributes of
Animal - Program usage help:
help - Adding an animal:
add - Listing all animals:
list - Deleting an animal:
delete - Editing an animal:
edit - Searching an animal:
search - Adds a task to an animal:
addtask - Deletes a task of an animal:
deletetask - Marking a task as done:
mark - Unmarking a task as done:
unmark - Reset all tasks:
reset - Viewing animal details
- Saving the data
- Editing the data file
- FAQ
- Known issues
- Command summary
Navigating the User Guide
Welcome to the Pawfection User Guide! Our goal is to empower you with the knowledge and confidence to unleash the full potential of Pawfection.
- Effortless Navigation: Use the table of contents for seamless navigation between sections.
- Quick Start for New Users: New to Pawfection? Get started with our Quick Start Guide as we handhold you through the process of setting up Pawfection.
- Features: Learn more about Pawfection's features and how to use them with our Features section.
- Tutorial: Get a step-by-step walkthrough of Pawfection's features with our Tutorial.
Quick start
- Check Java Installation. Ensure you have Java
11or above installed in your Computer.
- Press Win+R.
- Type cmd and press Enter to open your terminal.
- Type
java --versionand press Enter to check if java is installed. - If Java is not installed on your computer, a red error message will pop up. In that case, see below on installing Java 11.
- If Java is installed on your computer, some lines of white text will appear. Among these, there should be a line reading openjdk followed by a number, which is the version of Java. If you do not have Java 11 or later, see below on installing Java 11.
- Press Command+Space.
- Type Terminal and press Enter to open your terminal.
- Type
java --versionand press Enter to check if java is installed. - If Java is not installed on your computer, a red error message will pop up. In that case, see below on installing Java 11.
- If Java is installed on your computer, some lines of white text will appear. Among these, there should be a line reading openjdk followed by a number, which is the version of Java. If you do not have Java 11 or later, see below on installing Java 11.
- Open the terminal.
- Type
java --versionand press Enter to check if java is installed. - If Java is not installed on your computer, a red error message will pop up. In that case, see below on installing Java 11.
- If Java is installed on your computer, some lines of white text will appear. Among these, there should be a line reading openjdk followed by a number, which is the version of Java. If you do not have Java 11 or later, see below on installing Java 11.
If Java 11 is not installed, follow the instructions here to install Java 11.
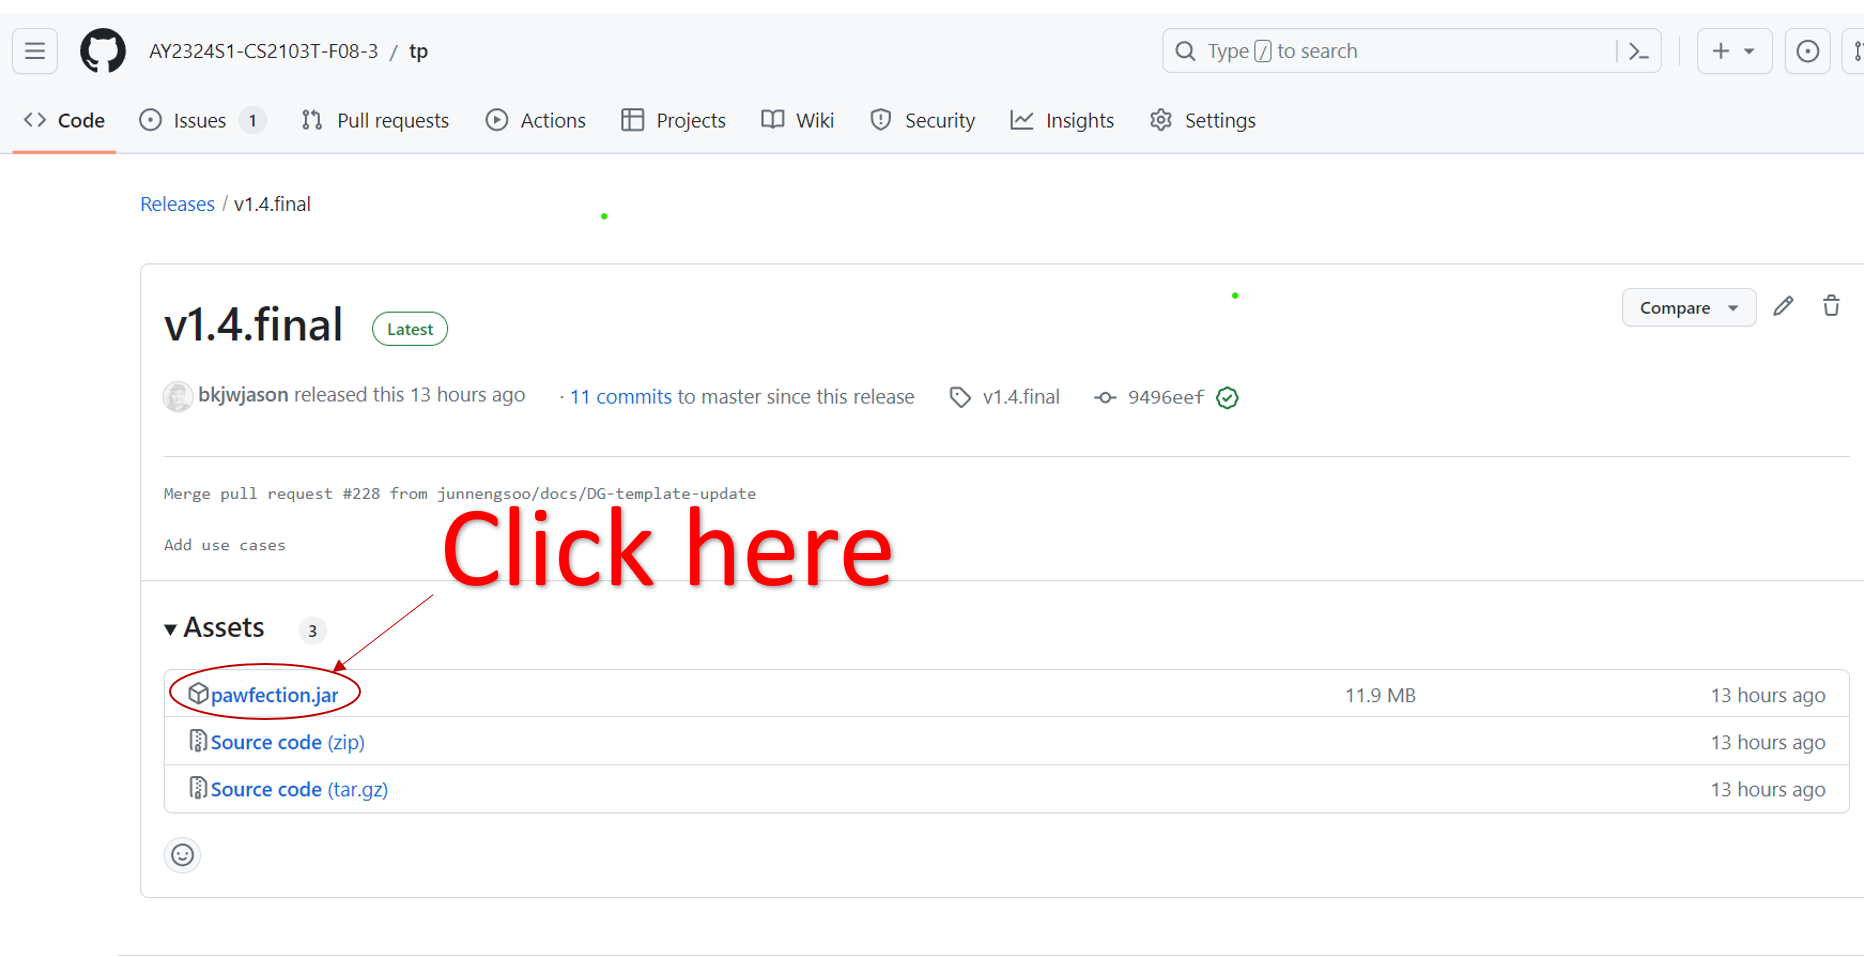
- Download Pawfection. Download the latest version of Pawfection (
pawfection.jar.) from our Github Release.
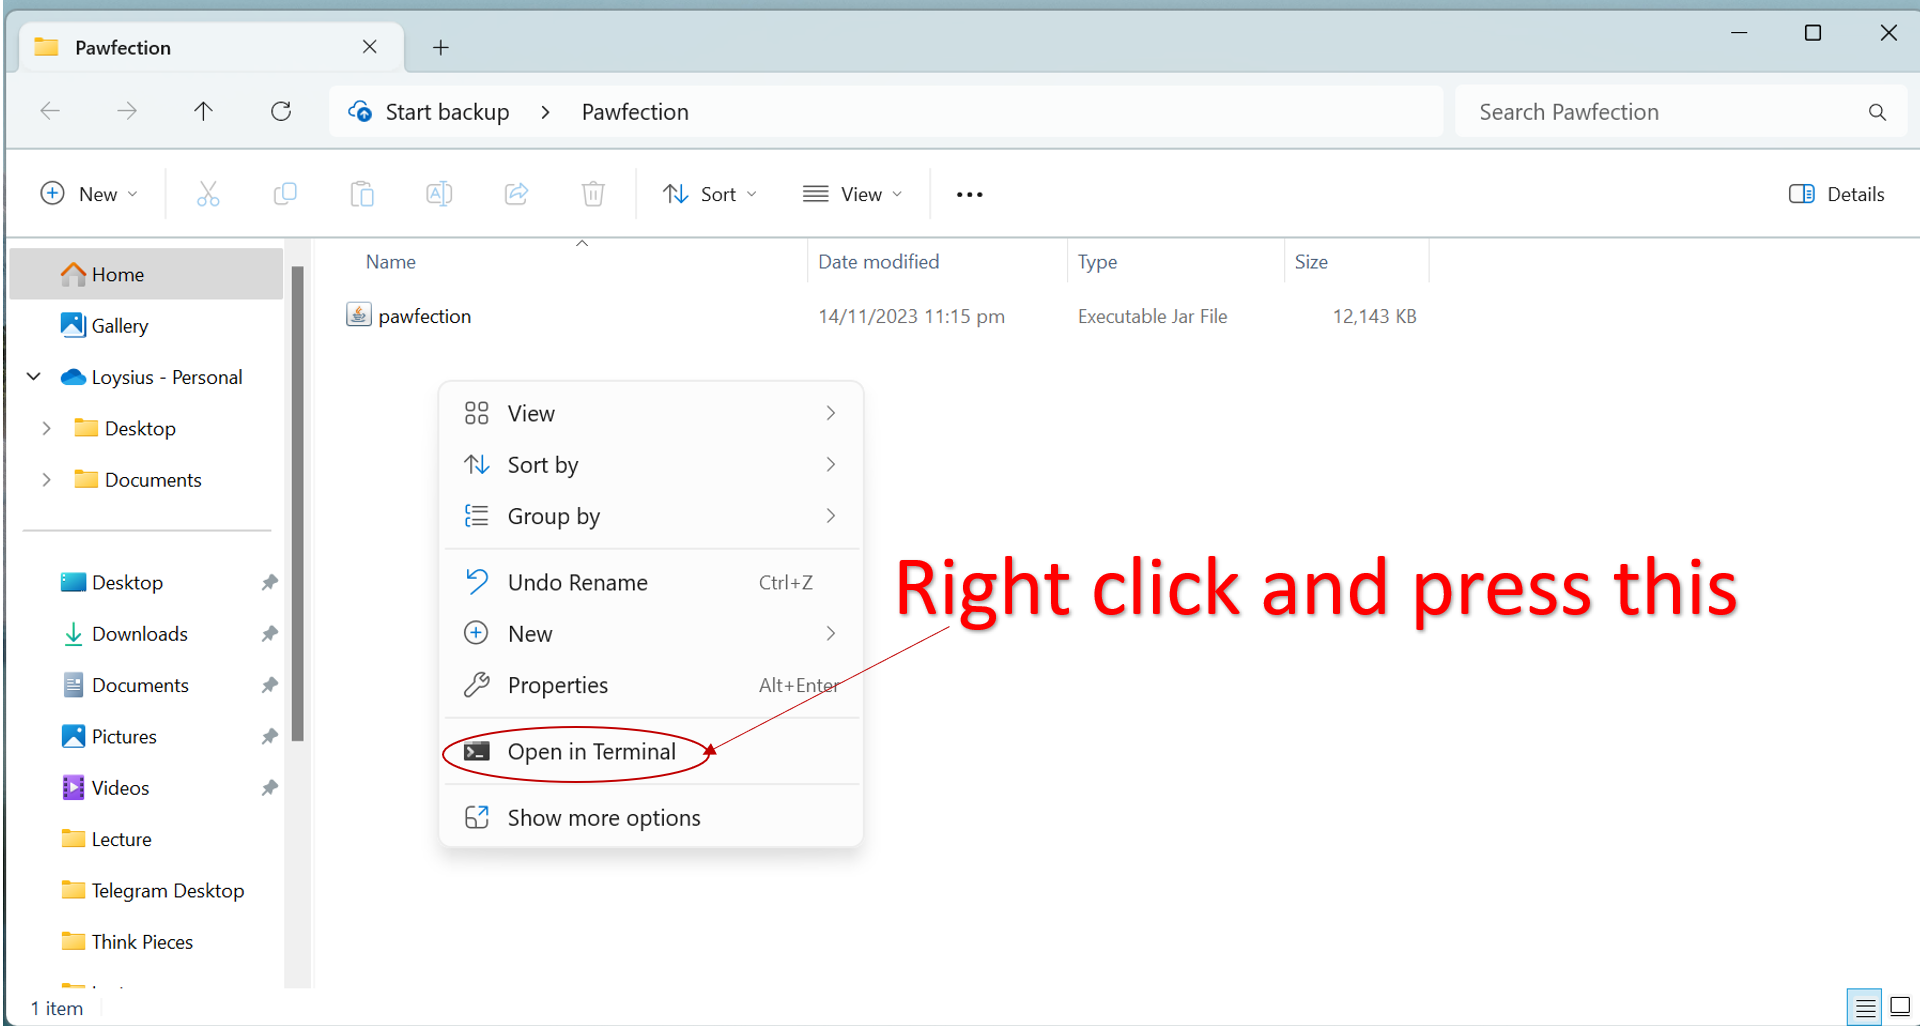
- Set Up Your Workspace. Copy the file to the folder you want to use as the home folder for your Pawfection.
Pawfection to keep things organized!Navigate to Workspace. Navigate to the folder containing the
pawfection.jarfile using this method:- Right-click the folder and select
New Terminal at Folder(Mac) orOpen in Terminal(Windows) to instantly navigate to the folder in your Terminal.
- Alternatively, you can manually navigate to the folder using the
cdcommand in your Terminal.
- Right-click the folder and select
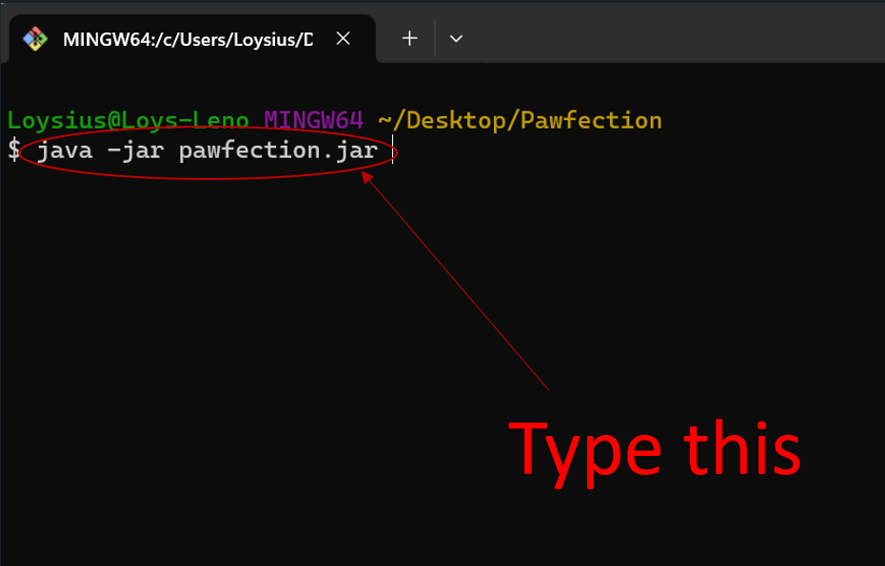
Run Pawfection. Use the
java -jar pawfection.jarcommand to run the application.Ensure you are in the correct location when running the above command!
- A GUI similar to the image below should appear in a few seconds. Note how the app contains some sample data.
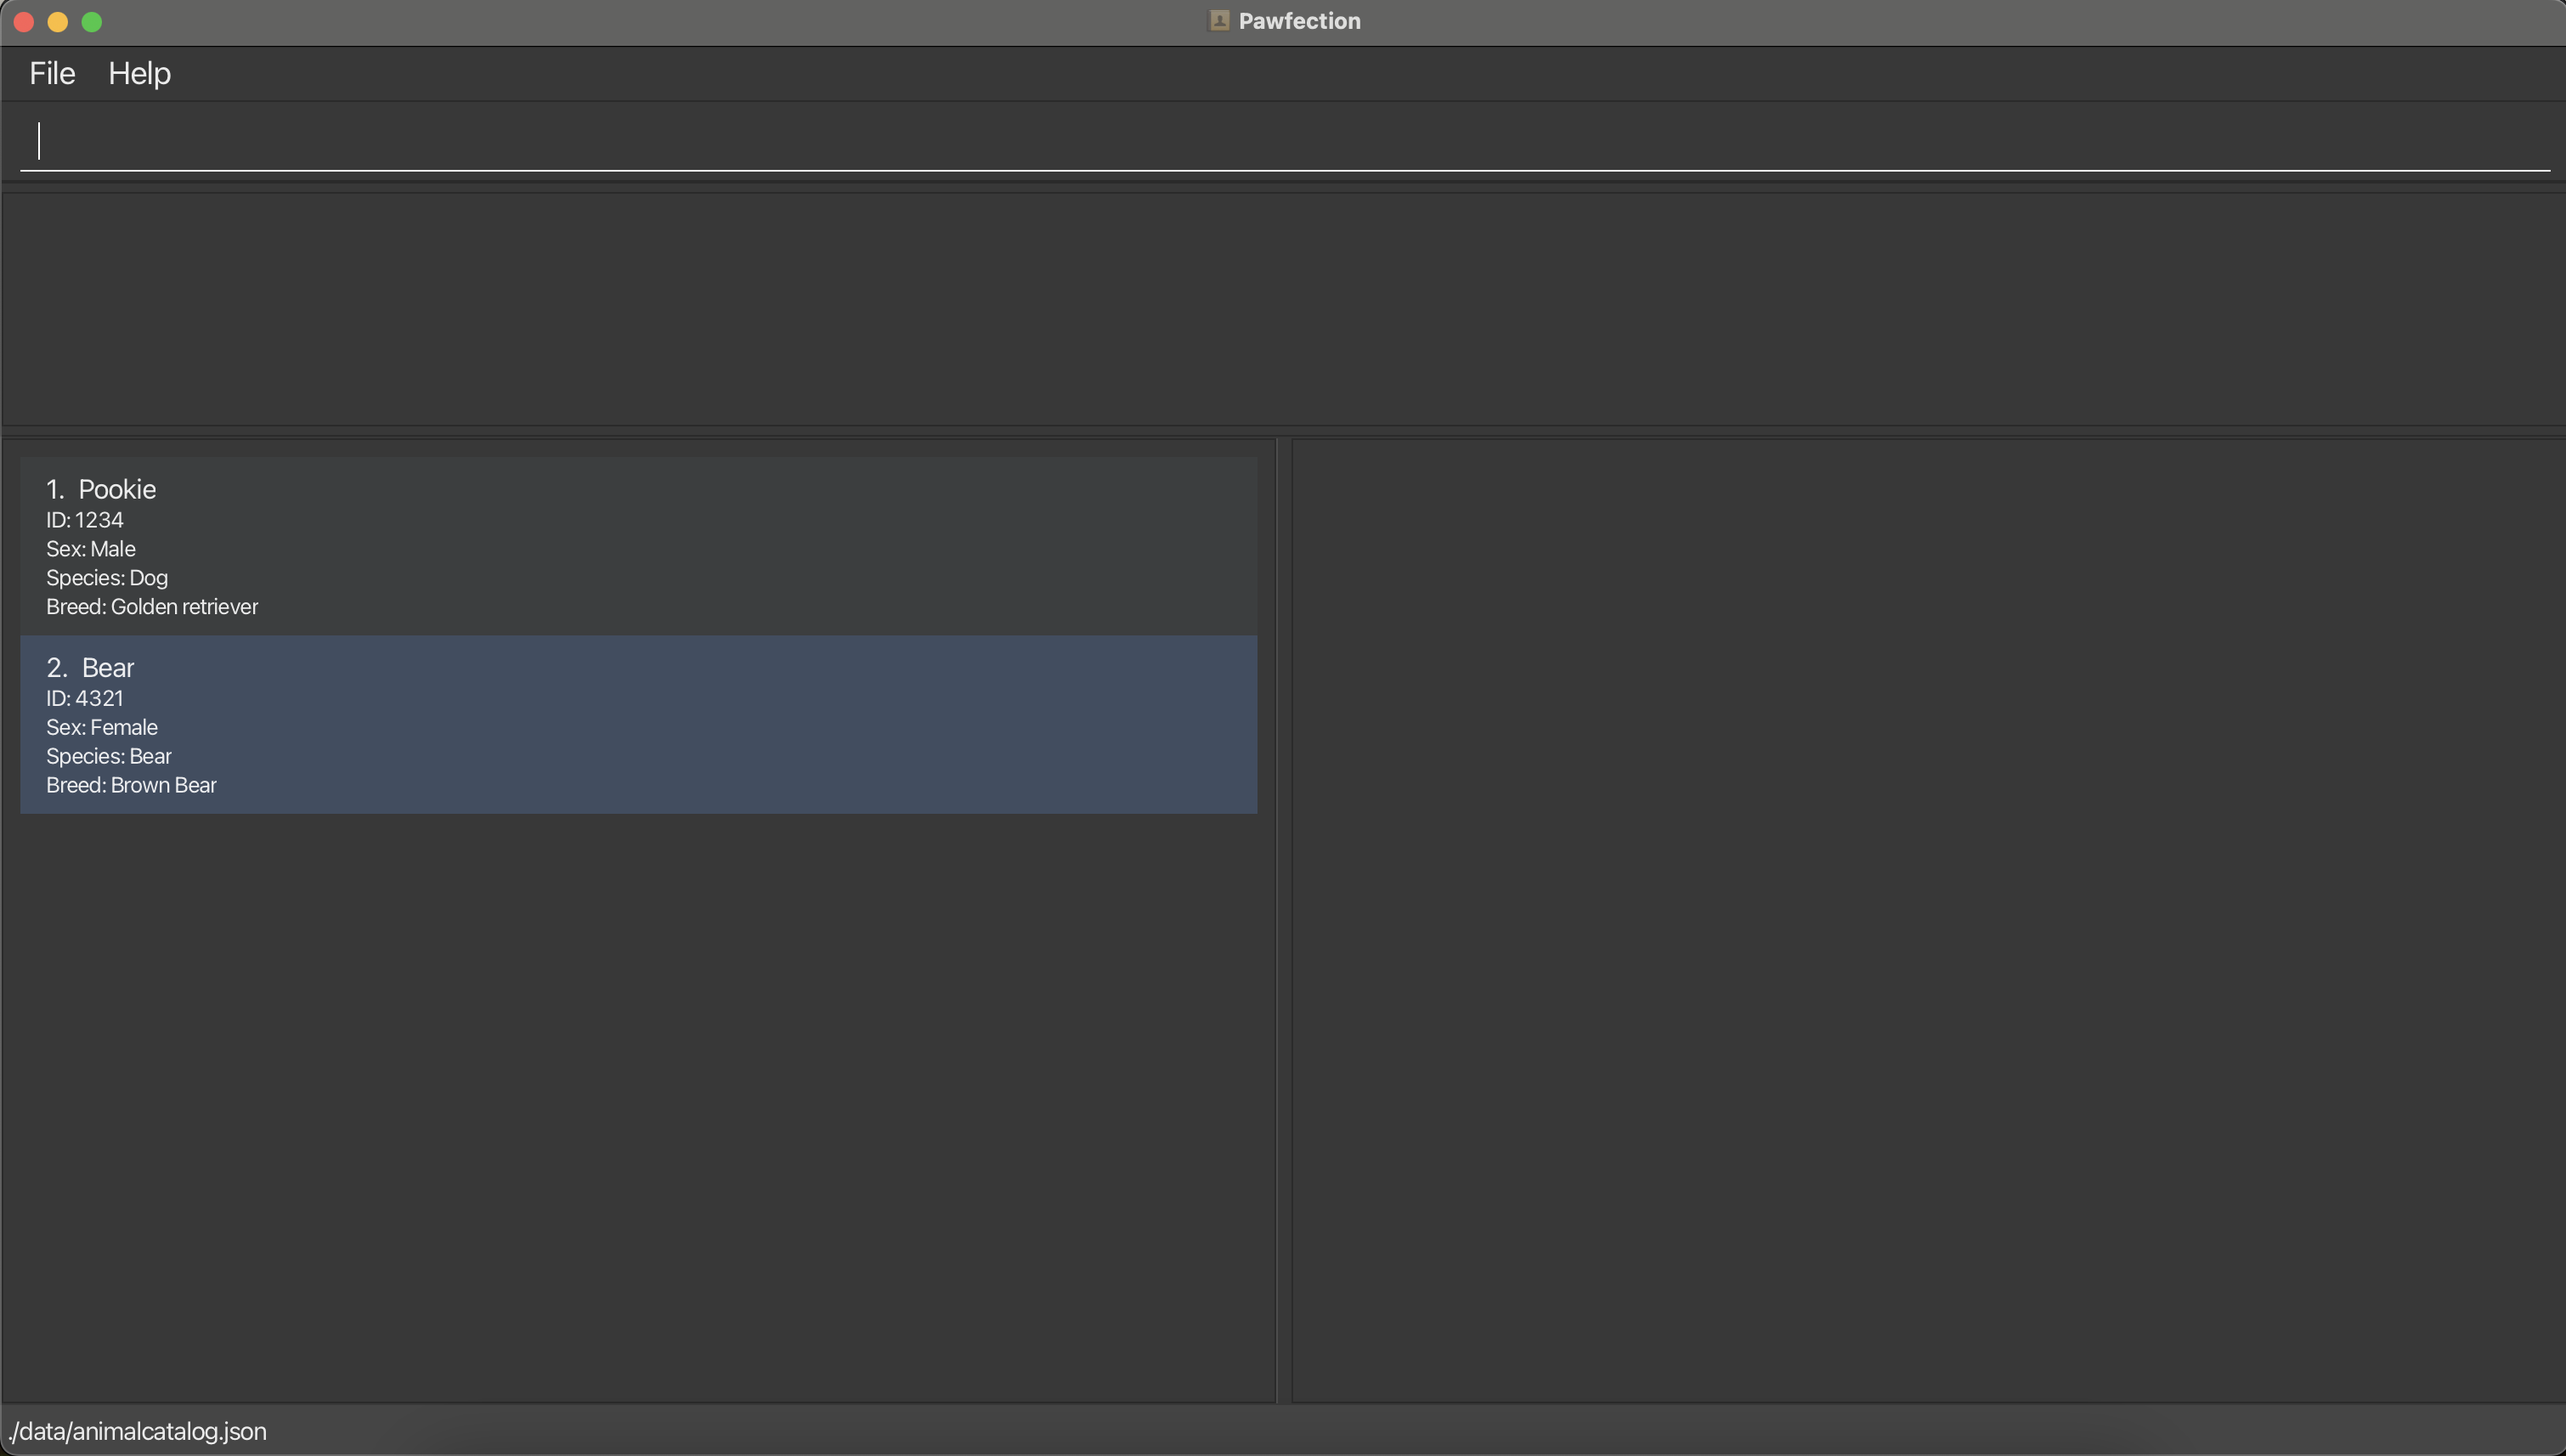
- Start using Pawfection!
Navigating the GUI
Main Window:
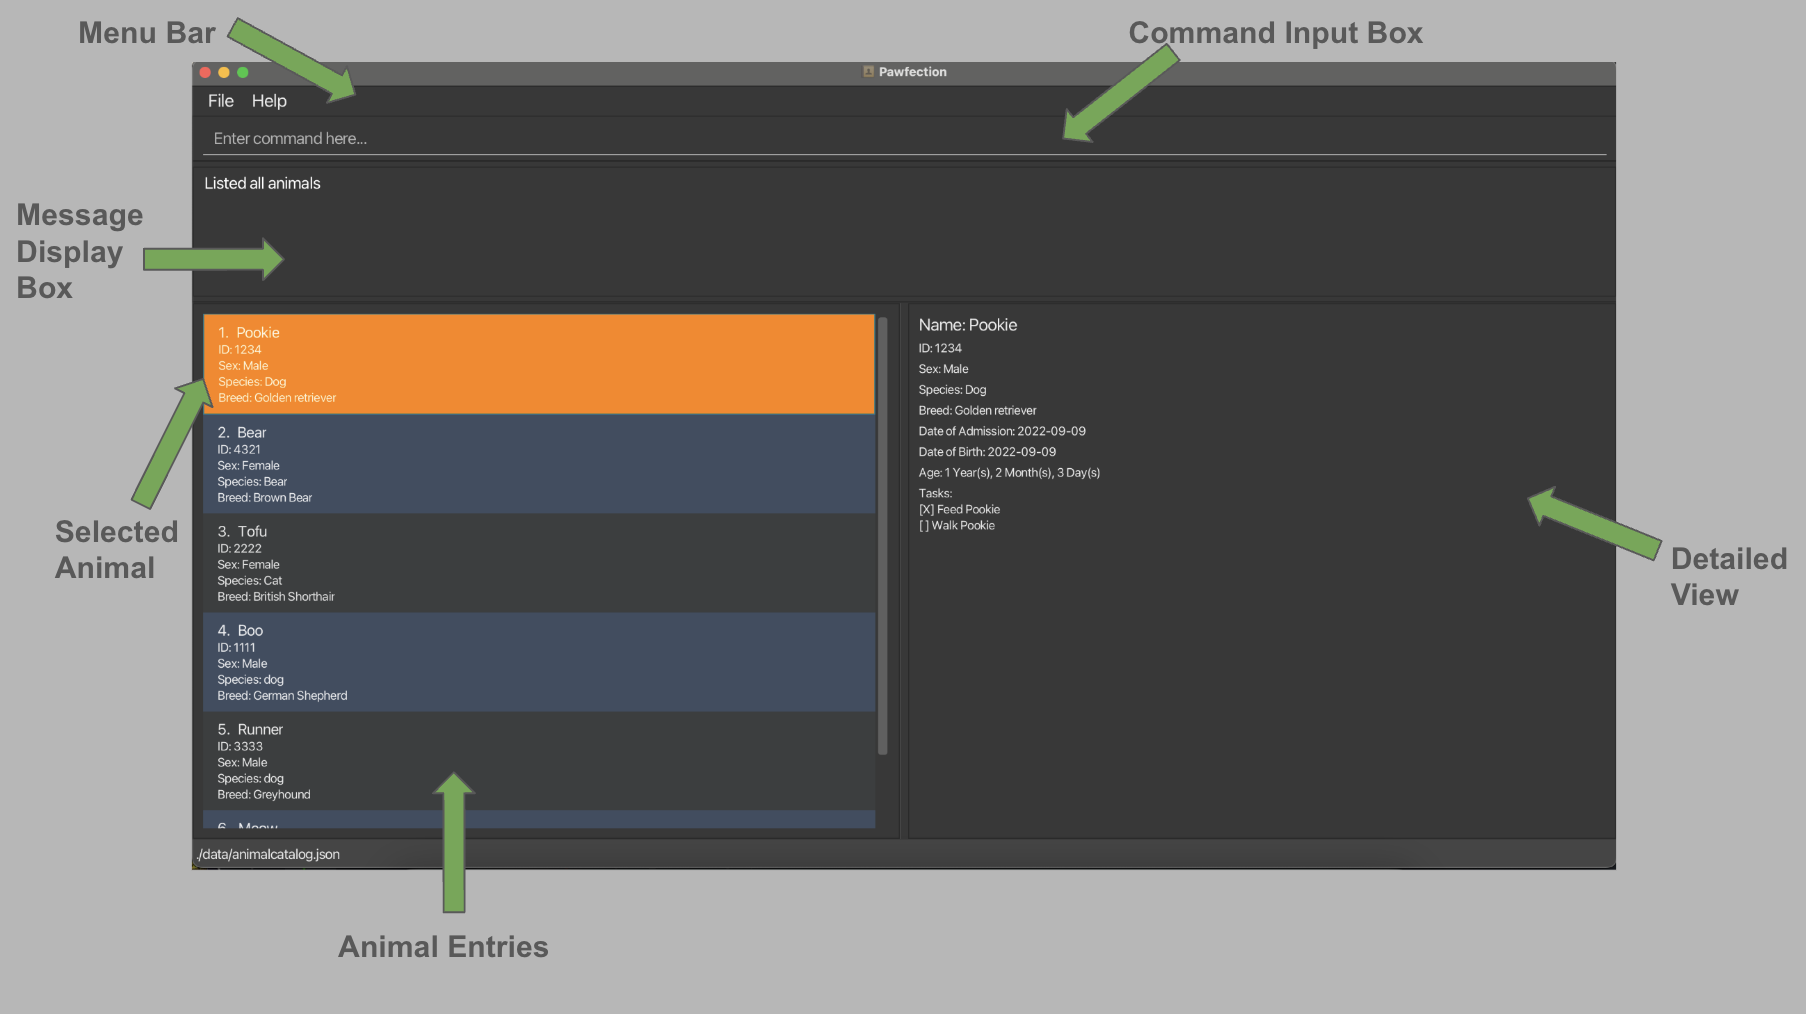
Here are the components of the Graphical User Interface (GUI), and their details.
GUI Components
| Component Name | Details |
|---|---|
| Menu Bar | Contains the drop down menus: File and Help. |
| Command Input Box | Text box for users to input commands. |
| Message Display Box | Box that displays result of command. Error messages will be displayed here as well. |
| Animal Entries | Contains information about individual animals currently at the shelter, including: Name, ID, Sex, Species and Breed of animal. |
| Selected Animal | Animal that is selected either by left-clicking on the animal entry, or selected by a command. Selected animal is highlighted in orange. |
| Detailed View | Box that contains more details about the currently selected animal. |
Pawfection Tutorial
- Starting Pawfection. Launch Pawfection. You may refer to here.
- Opening the Help Window. The help window can be opened by typing
helpin the command box and pressingEnter. The URL to this user guide will be displayed as seen in the image below.

- Using the Help Command. Now lets return to the main application and try using the
helpcommand more effectively by typinghelp adand pressingEnter. A list of commands that contain the keywordadwill be displayed.

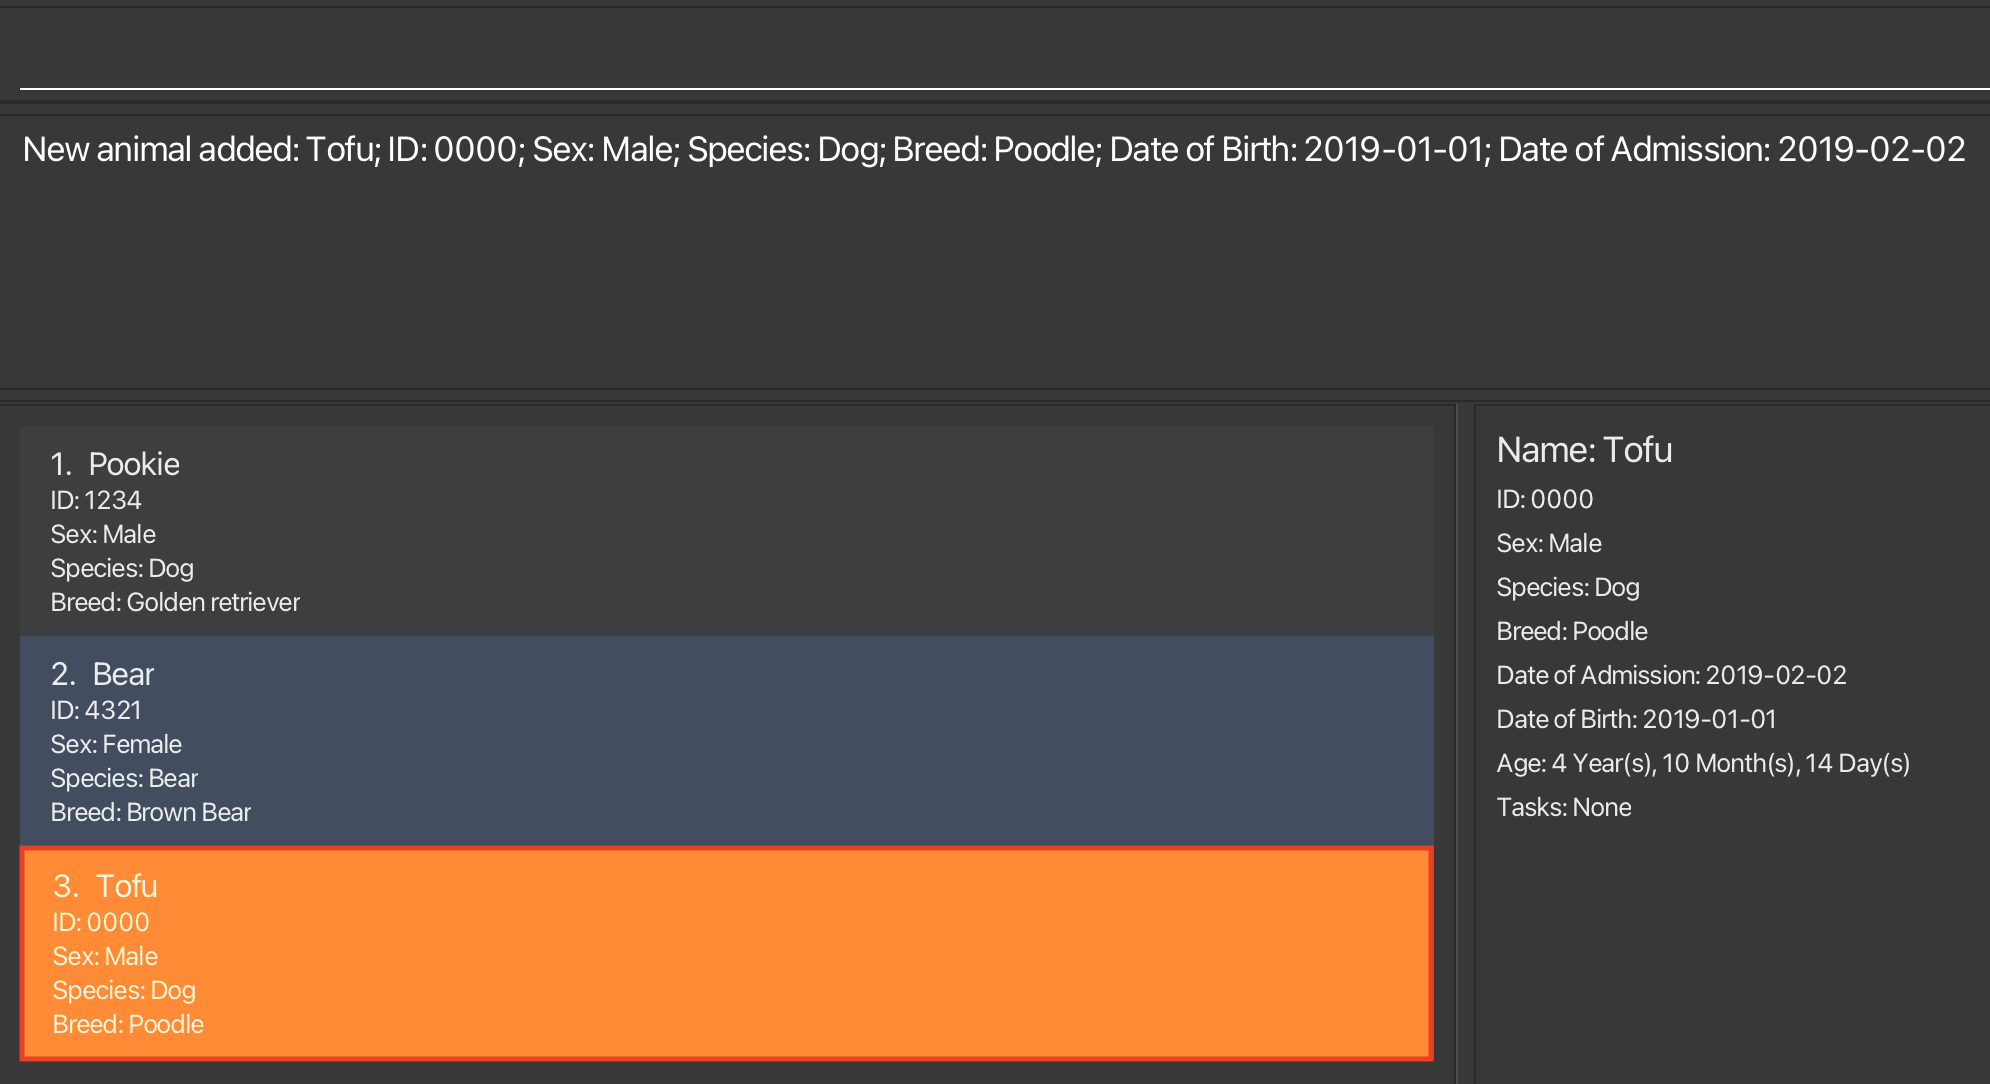
- Adding a New Animal. Let us try to add a new animal. Type in
add n/Tofu i/0000 g/Male db/2019-01-01 da/2019-02-02 s/Dog b/Poodleand pressEnter.Tofuis now added to the animal list!
Add more Animals. Try it out yourself! Add more animals to the list using the
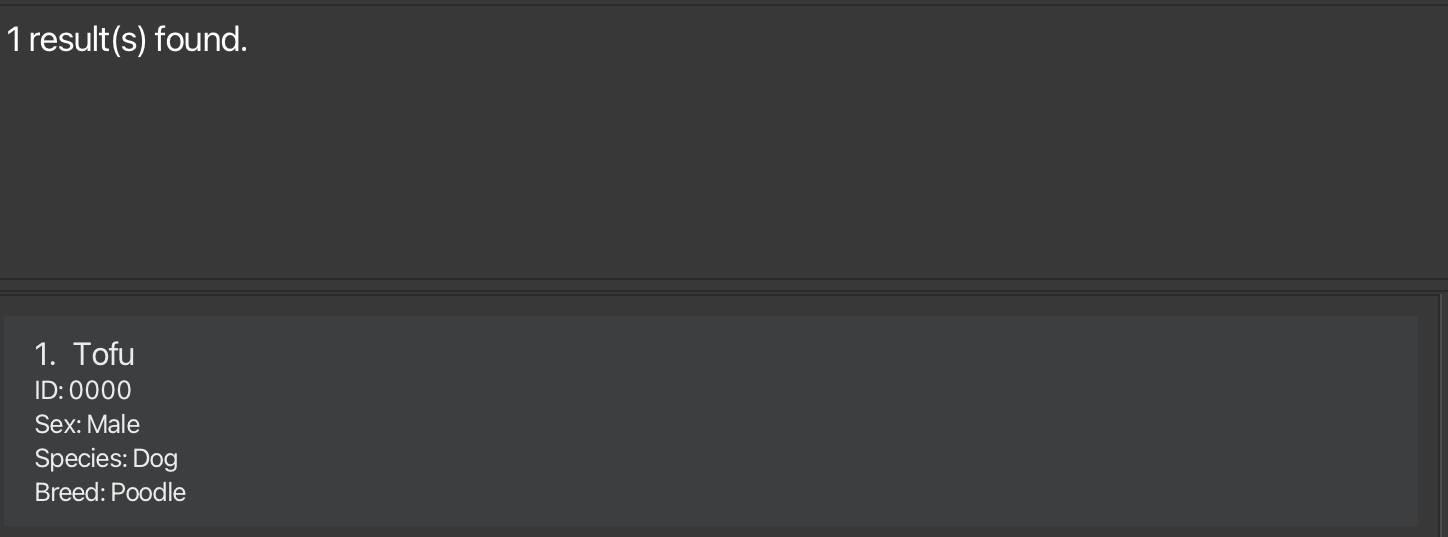
addcommand.Searching for Animals. Now that the list view is getting a little too crowded, let us try to search for animals. Type in
search n/Tofuand pressEnter. The animal list view will now only show animals with the nameTofu.
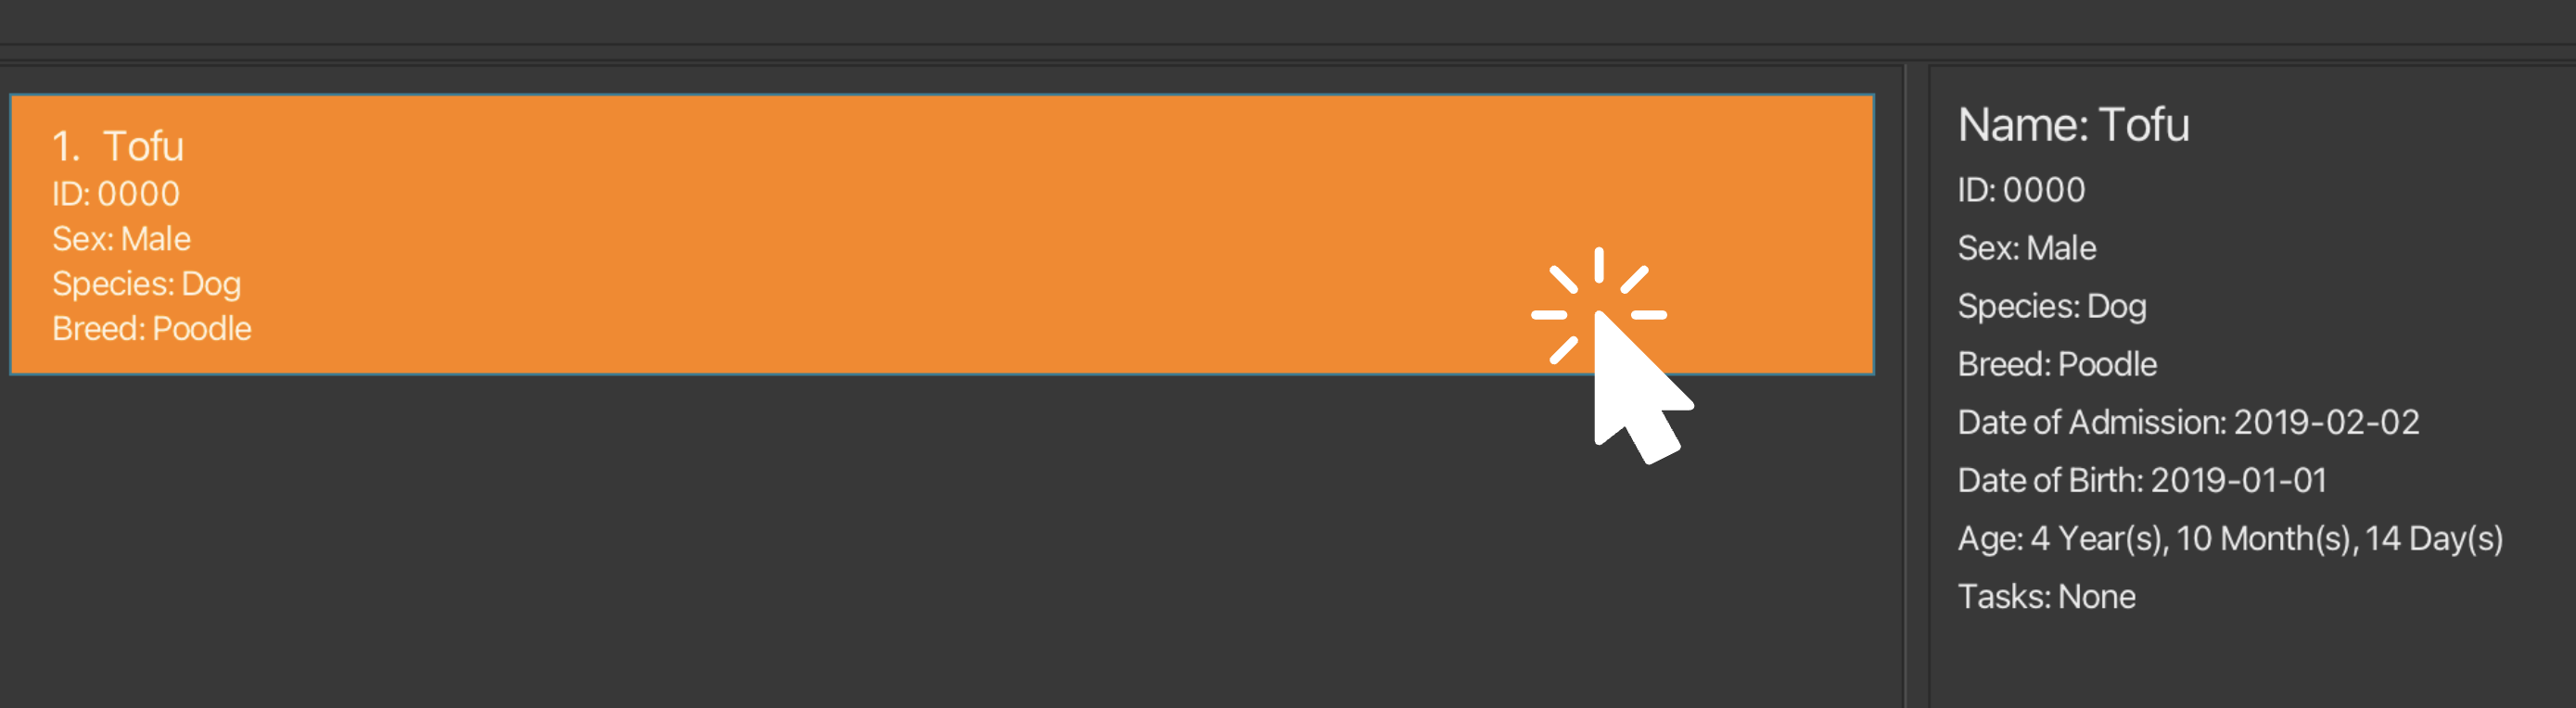
- Detailed Animal View. Let us try to view the details of
Tofu. Click on theTofucard on the left of GUI. The animal details view on the right will now show the details ofTofu.
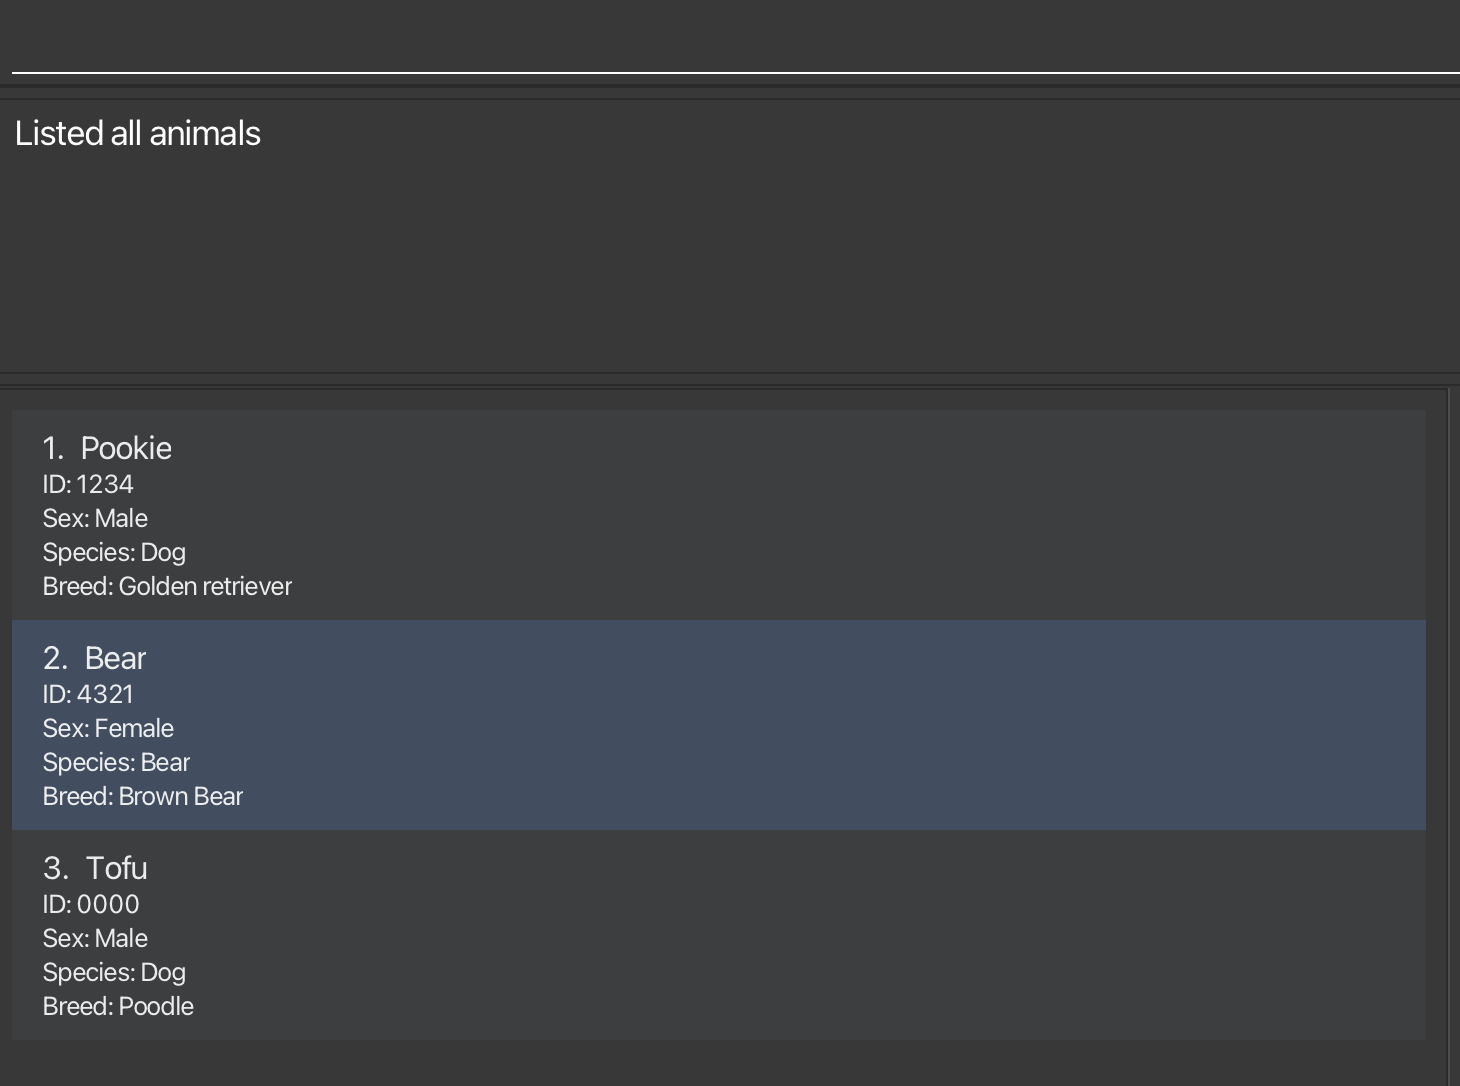
- Listing all Animals. How do we return to the original list view of animals? Type in
listand pressEnter. The animal list view will now show all animals.
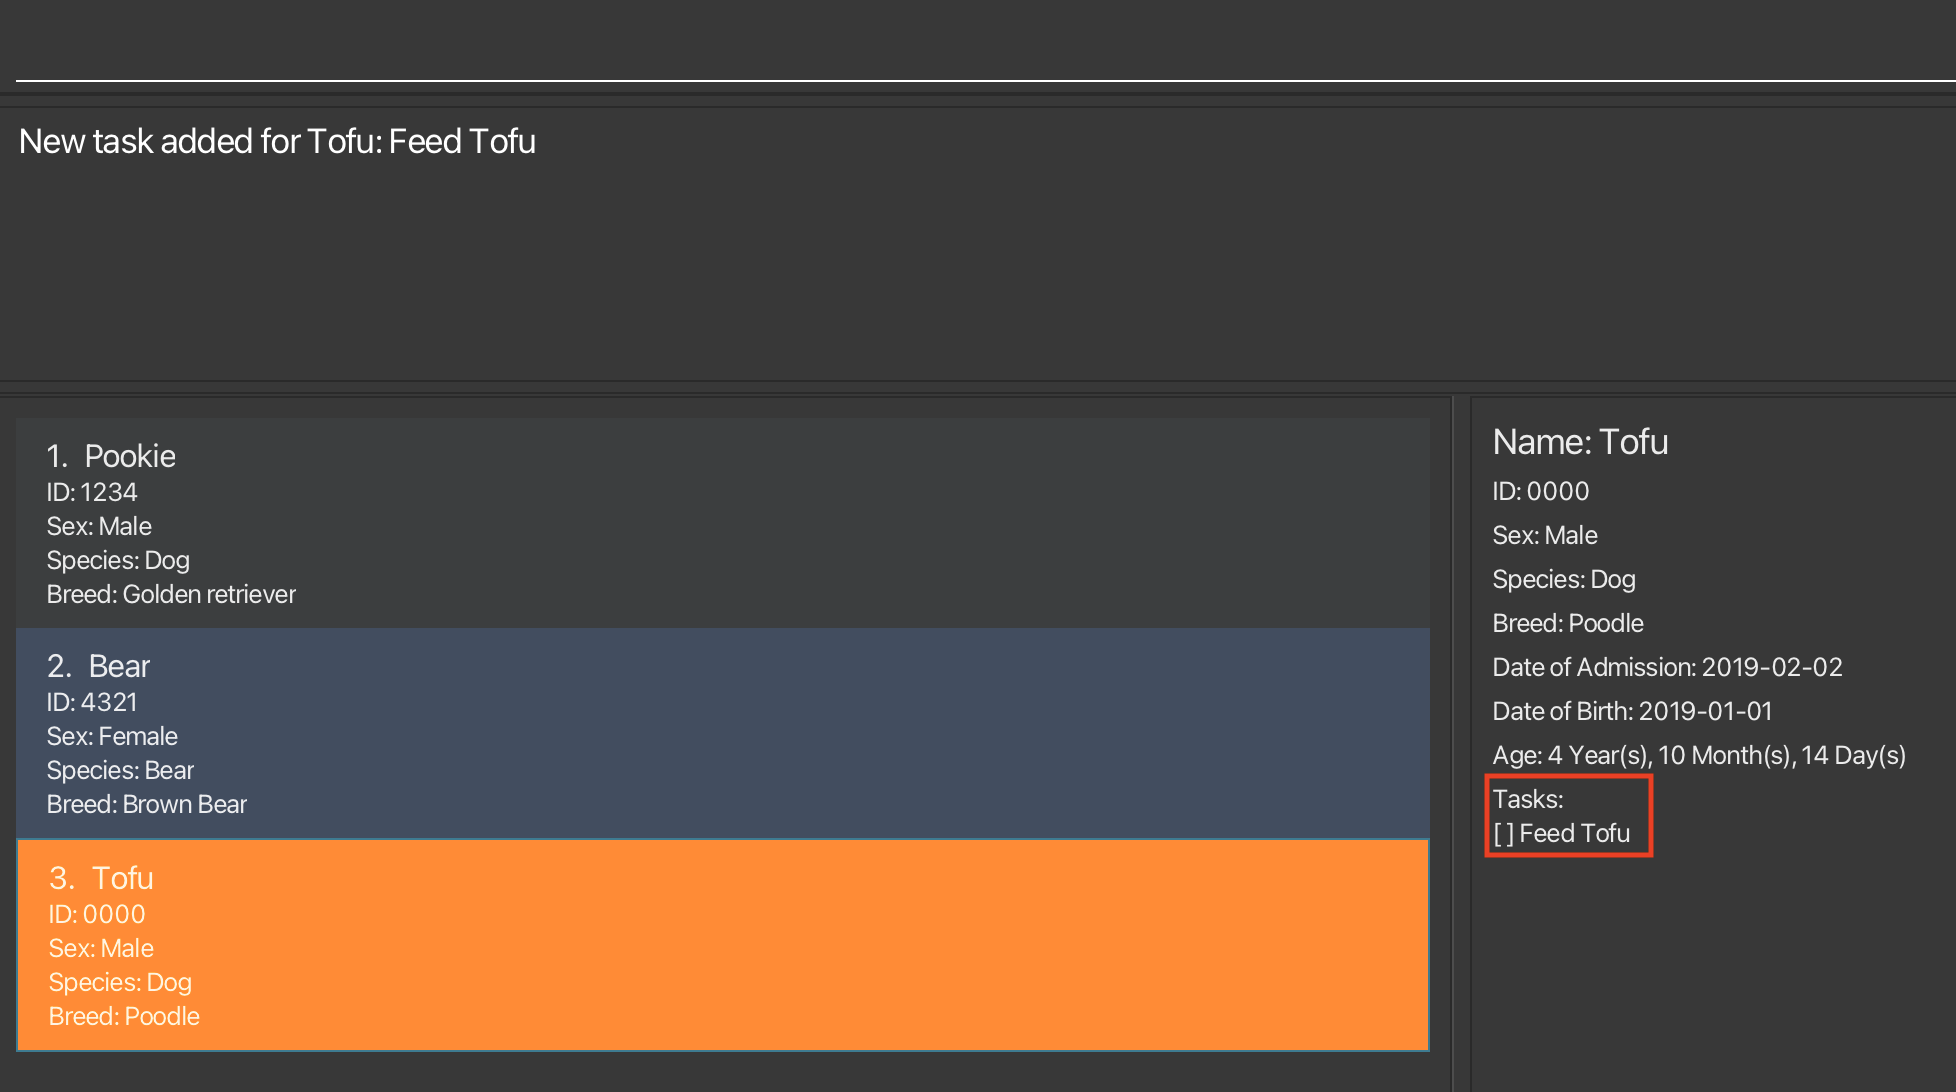
- Adding a Task. Now add a task to
Tofu. Type inaddtask 3 Feed Tofuand pressEnter. A task with the nameFeed Tofuis now added toTofu's task list.
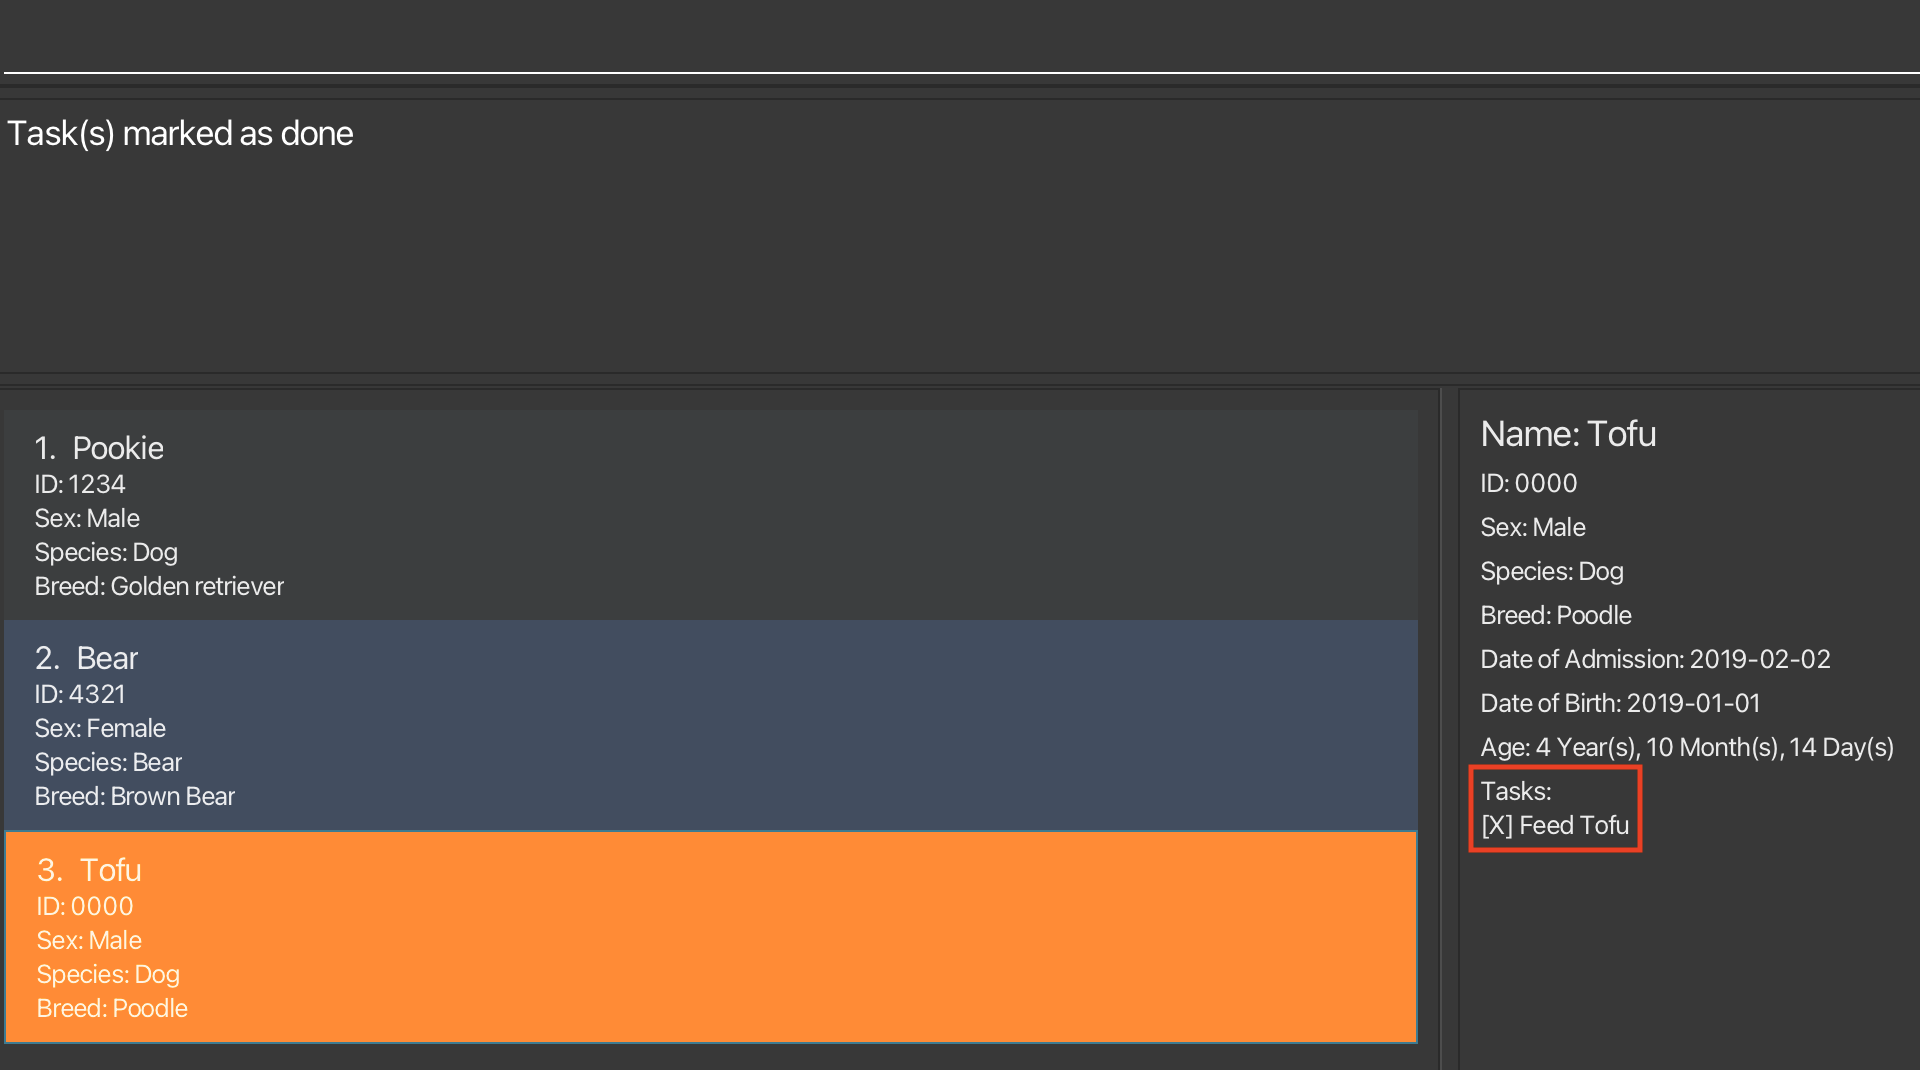
- Marking a Task as Done. Type in
mark 3 1and pressEnter. The first task ofTofuis now marked as done.
Congratulations! You are now ready to use Pawfection! Click here to explore other features.
Features
Command Format
Here are the main components of the commands:
| Component | Example | Description |
|---|---|---|
| Command Word | add, search | The command to be executed |
| Prefix | n/, i/ | The attribute of the animal |
| Parameter | NAME, ID | The value of the attribute of the animal, which is supplied by users |
| Index | 1, 2 | The position of the animal or task in the current list, based on 1-indexing, i.e first animal will be at index 1. |
To view the full list of animal attributes, refer to Attributes of Animal.
Here are the additional symbols used in the commands:
| Symbol | Example | Description |
|---|---|---|
| None | n/NAME | The parameter NAME is compulsory |
[ ] | [b/BREED] | The parameter BREED is optional |
... | TASK_INDEX ... | Multiple parameters of type TASK_INDEX can be accepted |
Notes about the command format:
Parameters can be in any order EXCEPT commands that take in
ANIMAL_INDEXandTASK_INDEXas inputs.
e.g. if the command specifiesn/NAME db/DOB,db/DOB n/NAMEis also acceptable.Extraneous parameters for some commands (e.g.
list,reset,search) will be ignored.
e.g. if the command specifiessearch 123 n/Pookie, it will be interpreted assearch n/Pookie.Prefixes are case-sensitive.
n/is not the same asN/.If you are using a PDF version of this document, be careful when copying and pasting commands that span multiple lines as space characters surrounding line-breaks may be omitted when copied over to the application.
Attributes of Animal
Summarized in the table below are the attributes of Animal along with their constraints. You are encouraged to read through
this table for an idea of what the attributes are supposed to look like, and refer to this table if you are unsure.
Attributes of Animal
| Format | Constraints | Example |
|---|---|---|
n/NAME | Alphanumeric, not blank |
|
i/ID | 4-digit, unique number |
|
g/SEX | Male/Female, case-insensitive |
|
s/SPECIES | Alphabets, separated by singular whitespace |
|
b/BREED | Alphabets, separated by singular whitespace |
|
db/DOB | yyyy-MM-dd format. Not in the future.Not chronologically later than DOA |
|
da/DOA | yyyy-MM-dd format. Not in the future.Not chronologically earlier than DOB |
|
Program usage help: help
Displays either a link to this User Guide in a pop-up, or the usage guide of the specified command.
Format:
Examples:
helphelp addhelp del
Things to note:
COMMAND_NAMEis case-insensitive, and is able to do partial matches. E.g. "a", "ad", "dd", "AdD" will all match with "add".
Upon success:
helpwill produce a link to the User Guide in a pop-up.

help addwill show usage guide of all commands that partial match withadd.

Upon failure:
Inputs that result in no partial matches will produce the following error message:
Command: COMMAND_NAME not recognized!
Adding an animal: add
Adds an animal to the animal catalog.
Format:
Examples:
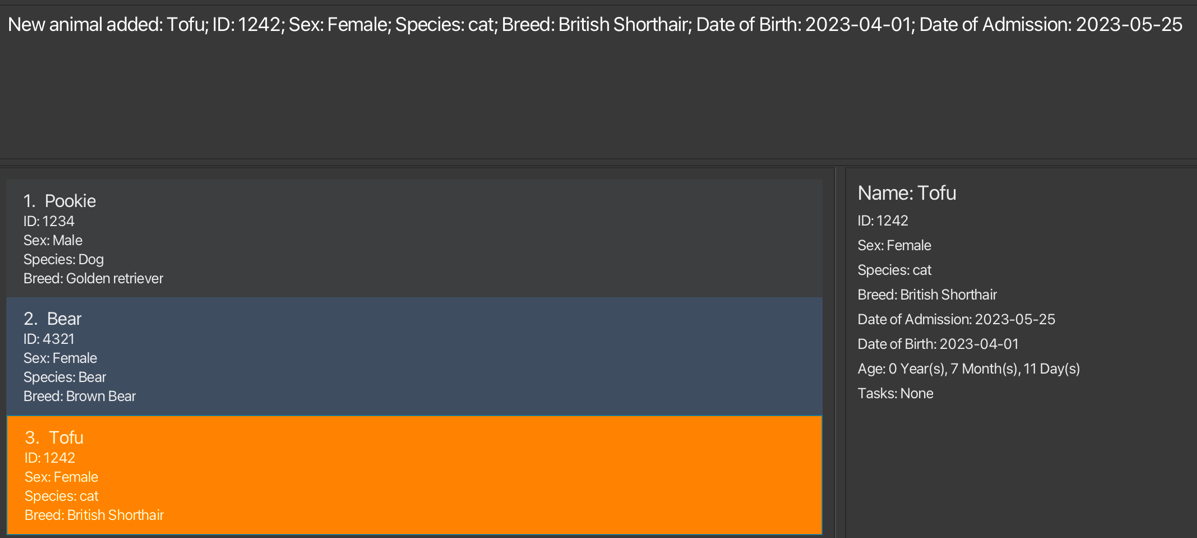
add n/Pookie i/1234 g/MALE db/2019-01-01 da/2019-02-02 s/Dog b/Poodleadd n/Tofu i/1242 g/female db/2023-04-01 da/2023-05-25 s/cat b/British Shorthair
Things to note:
- Animals are uniquely identified by their ID. Hence, attempting to add a new animal that has an ID that already exists in the AnimalCatalog is not valid.
- Refer to attributes of
Animalfor a better idea of the constraints of each attribute.
Upon success:
add n/Tofu i/1242 g/female db/2023-04-01 da/2023-05-25 s/cat b/British Shorthairadds Tofu to the list.
Upon failure:
Attempts to
addan animal with missing fields will produce the following error message listing the missing fields:Invalid Command! Missing prefixes:...Attempts to
addan animal with an ID that already exists in the AnimalCatalog will produce the following error message:This animal already exists in the CatalogAttempts to
addan animal with a wrong chronological DOB and DOA will produce the following error message:Date of Birth:{DOB} should not be chronologically after Date of Admission:{DOA}!Attempts to
addan animal with a wrong date format, or a date that does not exist e.g.2019-02-31will produce the following error message:Admission Date should be in the following format: '2023-10-15'
Listing all animals: list
Shows a list of all animals in the animal catalog.
Format:
Things to note:
- The list is sorted by the order in which the animals were added.
Deleting an animal: delete
Deletes the animal at the specified index from the animal catalog.
Format:
Examples:
delete 2
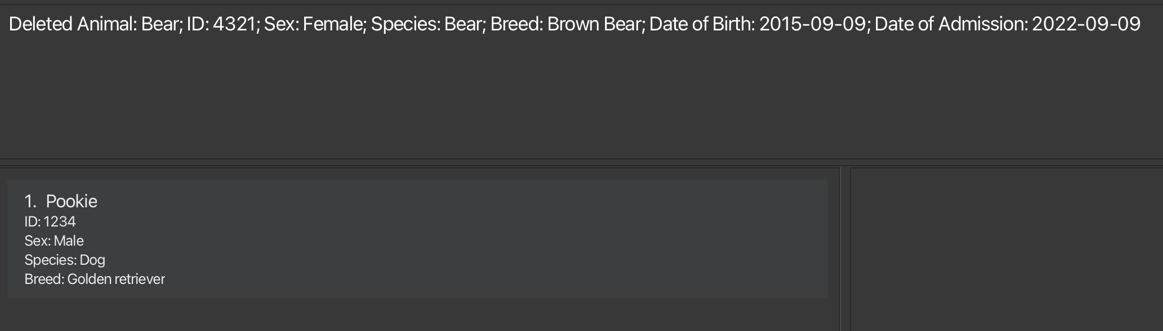
Upon success:
delete 2deletes the animal atINDEX 2.
Upon failure:
delete -1is not a valid command format due toINDEXnot being positive and will produce the following error message:Invalid command format! delete: Deletes the animal..."Invalid command formats will produce the following error message:
Invalid command format! delete: Deletes the animal identified by..."
Editing an animal: Edit
Edits animals specified by the index with the newly specified prefix attributes.
Format:
Examples:
edit 2 n/Pookieedit 1 s/Dog b/Poodle
Things to note:
- ID cannot be edited.
- At least one prefix must be provided.
- Refer to attributes of
Animalfor a better idea of the constraints of each attribute.
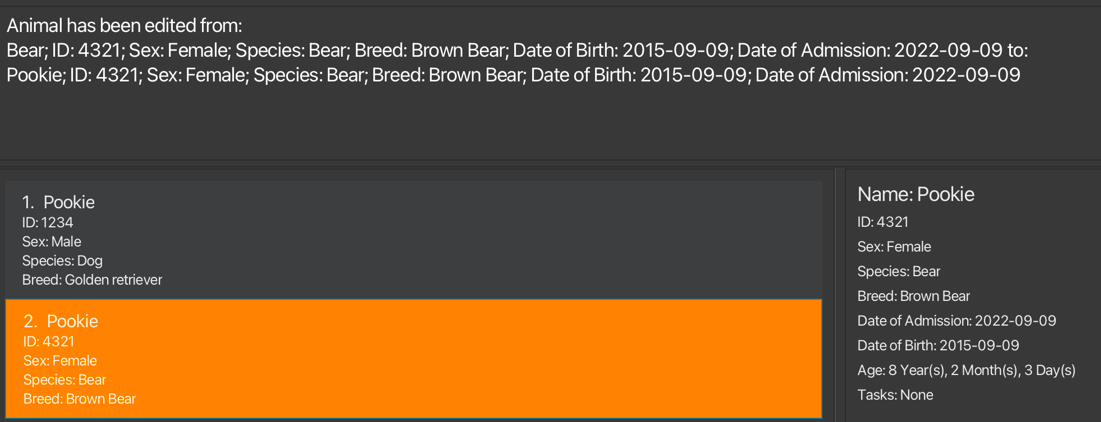
Upon success:
edit 2 n/Pookieedits the name of the animal atINDEX 2to bePookie.
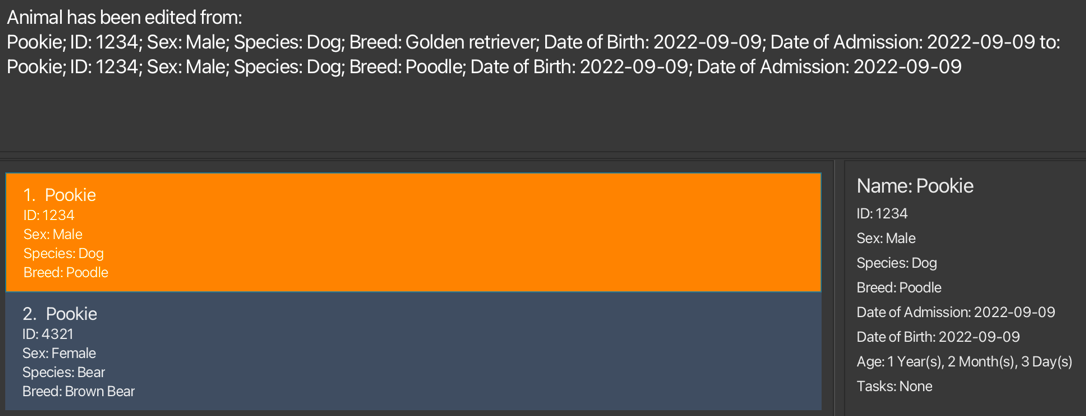
edit 1 s/Dog b/Poodleedits the species of the animal atINDEX 1to beDogand the breed to bePoodle.
Upon failure:
edit -1is an invalid command format due toINDEXnot being positive and will produce the following error message:Invalid command format! Example: edit 1...edit 100is an invalid command format due to missing prefix and will produce the following error message:At least one field to edit must be provided
Searching an animal: Search
Searches animals that are filtered using the specified prefixes.
Format:
Examples:
search n/Bearsearch n/Pookie b/Poodlesearch something n/Bearis equivalent tosearch n/Bearsearch nil/something n/Bear etc/elseis equivalent tosearch n/Bearsearch somethingandsearch nil/other else/otheris equivalent tosearch
Things to note:
- At least one prefix must be provided.
- The search is case-insensitive. e.g
n/pookiewill match animals namedPookie - Searches will only return complete matches of its respective attributes, not partial matches. e.g.
search n/earwill not match animals whose name containsearlikeBear, it will only search for animals whose names are spelt exactlyear. - If searching by more than 1 prefix, the animal's attribute has to match all the specified fields e.g.
search b/dog n/tofuwill only return a dog named tofu and not any other dog or any pet named tofu - Any unrecognized prefixes or empty prefix keywords provided will be ignored.
- Refer to attributes of
Animalfor a better idea of the constraints of each attribute.
Upon success:
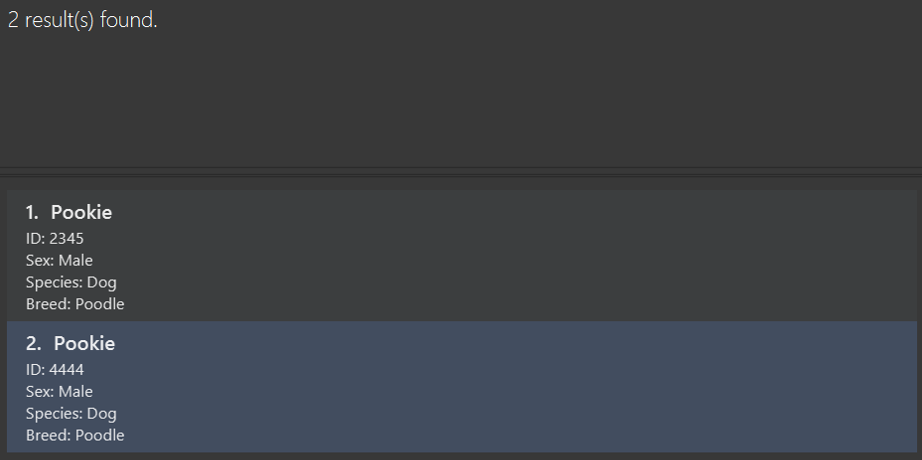
search n/Bearreturns all animals with the nameBear, not animals whose species isBear

search n/Pookie b/Poodlereturns all animals with the namePookieand is of the breedPoodle
Upon failure:
If no valid inputs are provided, the search will return the following error message.
Search keywords cannot be empty! At least one prefix must be provided.
Adds a task to an animal: addtask
Adds a new task with the specified description to the task list of an animal.
Examples:
addtask 1 Feed Pookie
Format:
Things to note:
- The
TASKrefers to the description of the task that you want to add into the task list of the animal. - Adding multiple
TASKwith the same description is allowed.
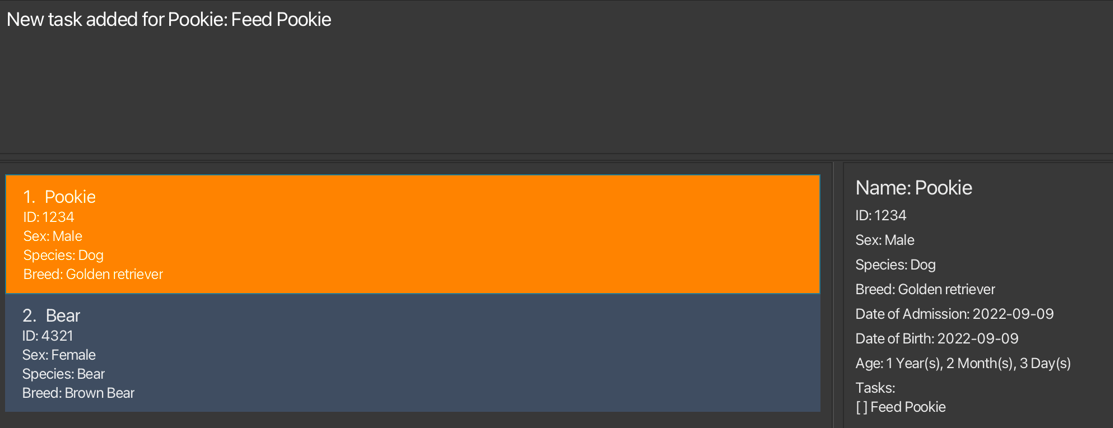
Upon success:
addtask 1 Feed Pookieadds a task with nameFeed Pookieto the task list of the first animal.
Upon failure:
If the
ANIMAL_INDEXprovided is out of range, the following error message will be produced:The animal index provided is invalidIf the
ANIMAL_INDEXprovided is negative or zero, the following error message will be produced:Invalid command format!
Deletes a task of an animal: deletetask
Deletes the task at the specified task index from the task list of the animal at the specified animal index.
Format:
Examples:
deletetask 1 1
Things to note:
ANIMAL_INDEXandTASK_INDEXmust be separated by a space. E.g.deletetask 12will be treated as delete task from animal with index 12, but because there is a missingTASK_INDEX, the command is invalid.
- The order in which
ANIMAL_INDEXandTASK_INDEXis specified must be adhered to. - E.g. If the user intends to delete the task with index 2 from the animal with index 1, then it must be
deletetask 1 2. deletetask 1 2is not equivalent todeletetask 2 1.
Examples:
deletetask 1 1
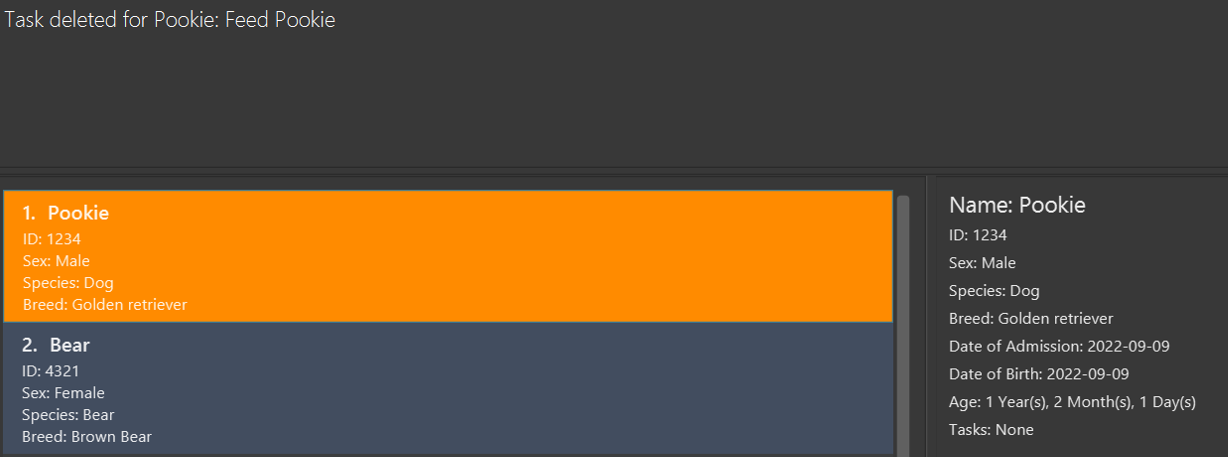
Upon success:
deletetask 1 1deletes the first task from the first animal in the list
Upon failure:
If the
ANIMAL_INDEXprovided is out of range, the following error message will be produced:The animal index provided is invalidIf the
TASK_INDEXprovided is out of range, the following error message will be produced:The task index provided is invalidIf the
ANIMAL_INDEXorTASK_INDEXprovided is negative or zero, the following error message will be produced:Invalid command format!
Marking a task as done: mark
Marks the task at the specified task index as done for the animal at the specified animal index.
Format:
Examples:
mark 1 1mark 2 1 2
Things to note:
- If multiple
TASK_INDEXare specified, all the tasks at the specifiedTASK_INDEXwill be marked as done. - All indexes must be separated by a space.
- If one of the
TASK_INDEXprovided is invalid, the rest of theTASK_INDEXwill not be marked as done. - Executing the
markcommand on task(s) previously marked as done will not cause an error to be thrown, and the task(s) would remain as marked.
- The order in which
ANIMAL_INDEXandTASK_INDEXis specified must be adhered to. - E.g. If the user intends to mark the task with index 2 from the animal with index 1, then it must be
mark 1 2. mark 1 2is not equivalent tomark 2 1.
Examples:
mark 1 1mark 2 1 2
Upon success:
mark 2 1 2marks the first and second task of the second animal as done.

Upon failure:
If no
TASK_INDEXis provided, the following error message will be produced:Task index(es) is/are missing!If no
ANIMAL_INDEXis provided, the following error message will be produced:Animal index is missing!If the
ANIMAL_INDEXprovided is out of range, the following error message will be produced:The animal index provided exceeds the number of animals!If any of the
TASK_INDEXprovided is out of range, the following error message will be produced:The task index(es) provided exceeds the number of tasks in the animal!
Unmarking a task as done: unmark
Marks the task at the specified task index as uncompleted for the animal at the specified animal index.
Format:
Examples:
unmark 1 1unmark 3 1 2
Things to note:
- If multiple
TASKINDEXare specified, all the tasks at the specifiedANIMAL_INDEXwill be marked as uncompleted. - All indexes must be separated by a space.
- If one of the
TASK_INDEXprovided is invalid, the rest of theTASK_INDEXwill not be marked as uncompleted. - Executing the
unmarkcommand on task(s) previously marked as uncomplete will not cause an error to be thrown, and the task(s) would remain as uncomplete (unmarked).
- The order in which
ANIMAL_INDEXandTASK_INDEXis specified must be adhered to. - E.g. If the user intends to mark the task with index 2 from the animal with index 1 as incomplete, then it must be
unmark 1 2. unmark 1 2is not equivalent tounmark 2 1.
Examples:
unmark 1 1unmark 3 1 2
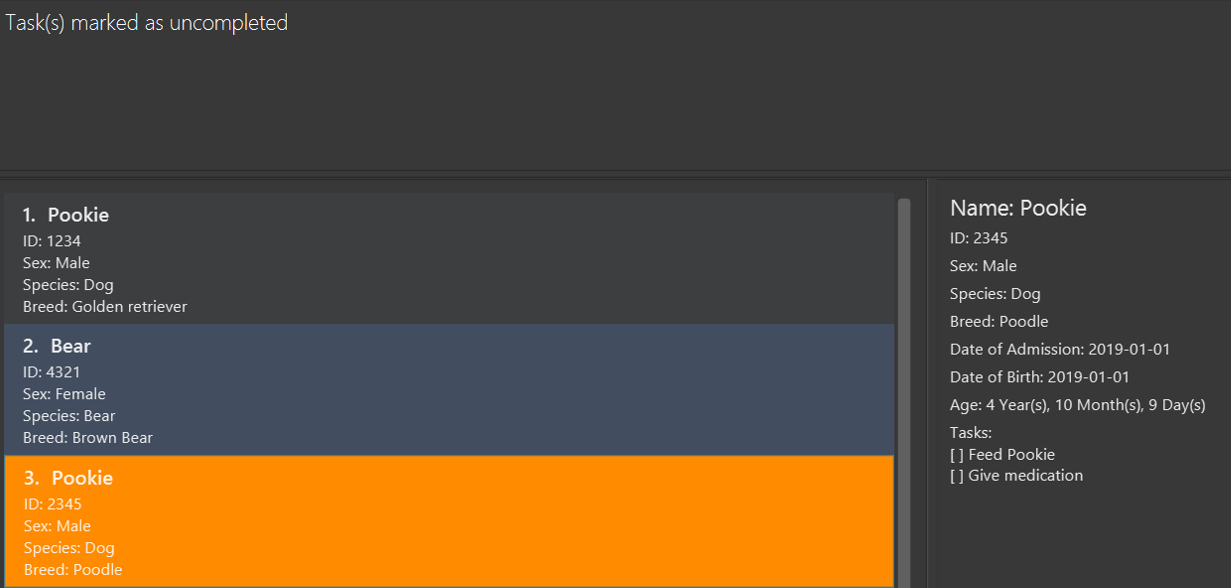
Upon success:
unmark 3 1 2marks the first and second task of the third animal as uncompleted.
Upon failure:
If no
TASK_INDEXis provided, the following error message will be produced:Task index(es) is/are missing!If no
ANIMAL_INDEXis provided, the following error message will be produced:Animal index is missing!If the
ANIMAL_INDEXprovided is out of range, the following error message will be produced:The animal index provided exceeds the number of animals!If any of the
TASK_INDEXprovided is out of range, the following error message will be produced:The task index(es) provided exceeds the number of tasks in the animal!
Reset all tasks: reset
Sets all tasks of all animals as uncompleted.
Format:
Things to note:
- Resets all tasks of all animals in the catalog, regardless of the current animal list view.
Upon success:
resetwill unmark all tasks of all animals and produce the following message:All tasks are have been reset
Viewing animal details
The detailed view panel on the right shows greater details about the selected animal. There are 2 ways to view the details of a certain animal:
- Left-click on the animal cell in the list of animals.
- Most animal-specific commands that involve specifying an
INDEXof animal will automatically show the details of the animal in the detailed view. Commands include:add,edit,addtask,deletetask,mark,unmark.
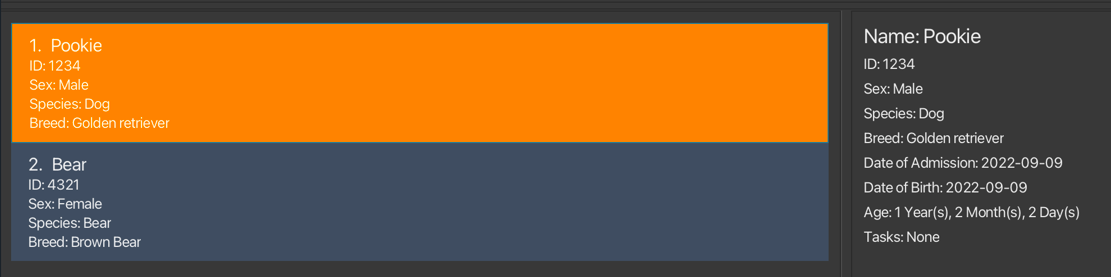
The animal cell whose details are currently being displayed in the detail view will be highlighted in orange.
- Note that certain commands will cause the selected animal and the detailed view to reset, and these include
list,delete,search, andhelpcommands. - For invalid animal-specific commands, the selected animal will not change.
Examples:
- Selecting an animal in the first cell will display the details as shown below, with the selected cell highlighted in orange.
edit 2 n/Poohwill automatically cause the animal atINDEX 2to show in the detailed view, since it is a command in the list of animal-specific commands.

Saving the data
Pawfection data are saved in the hard disk automatically after any command that changes the data. There is no need to save manually.
Editing the data file
Pawfection data are saved automatically as a JSON file [JAR file location]/data/animalcatalog.json. Advanced users are welcome to update data directly by editing that data file.
FAQ
Q: How do I transfer my data to another Computer?
A: Install the app in the other computer and overwrite the empty data file it creates with the file that contains the data of your previous Pawfection home folder.
Known issues
- When using multiple screens, if you move the application to a secondary screen, and later switch to using only the primary screen, the GUI will open off-screen. The remedy is to delete the
preferences.jsonfile created by the application before running the application again.
Command summary
| Action | Format, Examples |
|---|---|
| Add | add n/NAME i/ID db/DOB da/DOA g/SEX b/BREED s/SPECIES |
| Edit | edit INDEX [n/NAME] [g/SEX] [s/SPECIES] [b/BREED] [db/DOB] [da/DOA] |
| Delete | delete INDEXe.g., delete 3 |
| List | list |
| Search | search [n/NAME] [i/ID] [g/SEX] [s/SPECIES] [b/BREED] [db/DOB] [da/DOA]e.g. search n/Pookie b/Poodle |
| Addtask | addtask ANIMAL_INDEX TASKe.g. addtask 1 Feed Pookie |
| Deletetask | deletetask ANIMAL_INDEX TASK_INDEXe.g. deletetask 1 1 |
| Mark | mark ANIMAL_INDEX TASK_INDEX [TASK_INDEX]...e.g. mark 2 1 2 |
| Unmark | unmark ANIMAL_INDEX TASK_INDEX [TASK_INDEX]...e.g. unmark 2 1 2 |
| Reset | reset |
| Help | help [COMMAND_NAME] |